 Nginx is a highly popular and efficient web server that is widely used on Linux servers. It allows you to configure it as a standalone web server or as a reverse proxy for other web applications. In this article, we will learn how to configure Nginx as a web server and reverse proxy for Apache on a Ubuntu 20.04 server in your web hosting.
Step 1: Install Nginx and Apache on Ubuntu 20.04
First, we need to install Nginx and Apache on our Ubuntu 20.04 server. You can do this by using the following commands in the terminal:
sudo apt update
sudo apt install nginx apache2
Step 2: Configure Nginx as a Web Server
After installing Nginx, we will configure it as a standalone web server. To do this, we need to create a new configuration file for Nginx. Use your favorite text editor to create a file named example.com in the directory /etc/nginx/sites-available/ with the following content:
server {
listen 80;
listen [::]:80;
server_name example.com www.example.com;root /var/www/example.com/html;
index index.html;location / {
try_files $uri $uri/ =404;
}
}
This configuration file tells Nginx to listen on port 80 for requests to the domain example.com and its www subdomain. It also specifies the root directory for the website files and the default index file.
Next, we need to create a symbolic link to enable this configuration file. Use the following command to create the link:
sudo ln -s /etc/nginx/sites-available/example.com /etc/nginx/sites-enabled/
Finally, restart Nginx to apply the new configuration:
sudo systemctl restart nginx
Now, you can access your website by visiting http://example.com or http://www.example.com.
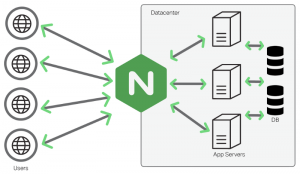
Step 3: Configure Nginx as a Reverse Proxy for Apache
Next, we will configure Nginx as a reverse proxy for Apache. This will allow Nginx to handle incoming requests and forward them to Apache, which will serve the actual web pages.
First, we need to stop Apache from listening on the default port 80. Use the following command to disable the default Apache site:
sudo a2dissite 000-default
Next, we need to create a new Apache configuration file for our website. Use your favorite text editor to create a file named example.com.conf in the directory /etc/apache2/sites-available/ with the following content:
<VirtualHost *:8080>
ServerAdmin [email protected]
ServerName example.com
DocumentRoot /var/www/example.com/html<Directory /var/www/example.com/html>
Options Indexes FollowSymLinks MultiViews
AllowOverride All
Order allow,deny
allow from all
</Directory>
</VirtualHost>
This configuration file tells Apache to listen on port 8080 for requests to the domain example.com. It also specifies the root directory for the website files and enables the use of .htaccess files.
Next, we need to enable this Apache site and restart Apache:
sudo a2ensite example.com.conf
sudo systemctl restart apache2
Finally, we need to configure Nginx as a reverse proxy for Apache. Use your favorite text editor to modify the /etc/nginx/sites-available/example.com configuration file as follows:
server {
listen 80;
listen [::]:80;
server_name example.com www.example.com
server {
listen 80;
listen [::]:80;
server_name example.com www.example.com;location / {
proxy_pass http://localhost:8080;
proxy_set_header Host $host;
proxy_set_header X-Real-IP $remote_addr;
proxy_set_header X-Forwarded-For $proxy_add_x_forwarded_for;
}location /static/ {
alias /var/www/example.com/static/;
expires 1h;
add_header Cache-Control “public, max-age=3600”;
}
}
The location / block tells Nginx to pass all requests to http://localhost:8080, which is where Apache is listening. The proxy_set_header directives pass along some additional information about the request to Apache, such as the original host name and IP address.
The location /static/ block is used to serve static files directly from Nginx, without passing them through Apache. This can improve performance for static files like images, CSS, and JavaScript files.
Finally, restart Nginx to apply the new configuration:
sudo systemctl restart nginx
Now, Nginx will handle all incoming requests for http://example.com and http://www.example.com. It will pass requests for dynamic content to Apache and serve static files directly.